Lenses provides a secure and audited gateway to your streaming data in Apache Kafka. Our SQL Engine opens streaming data further to empower anyone with knowledge of SQL to explore and analyse streaming data.
This tutorial will illustrate how you can use SQL and the Lenses Data API from the Lenses UI, the Lenses command line utility and with the help of a WebSocket client.
Pre-requisites
In order to follow this tutorial, you are going to need Lenses and lenses-cli
You can download the free Lenses Box from here, which comes with an instance of Lenses and a complete Kafka environment as a single Docker image in order to follow the examples of this tutorial.
Similarly, you can get Lenses CLI from here. Please always use the latest version of Lenses CLI.
Lenses SQL Engine
The Lenses SQL engine provides users with an enterprise-grade, expressive, powerful and declarative Structured Query Language with industry standard ANSI joins and aggregates for querying, transforming and manipulating data. Although this tutorial will present simple examples, Lenses SQL can be used for more advanced and complex queries.
Security
It’s important to specify that data across any channel is protected using Lenses’ security model including use of namespaces and integrations with enterprise security solutions such as identity management. Read Christina’s blog on the subject. Data Policies feature in Lenses provides the ability to annoymise field level data returned by queries.
Using Lenses Data API
Here are the three methods with examples to access data via Lenses
Lenses UI
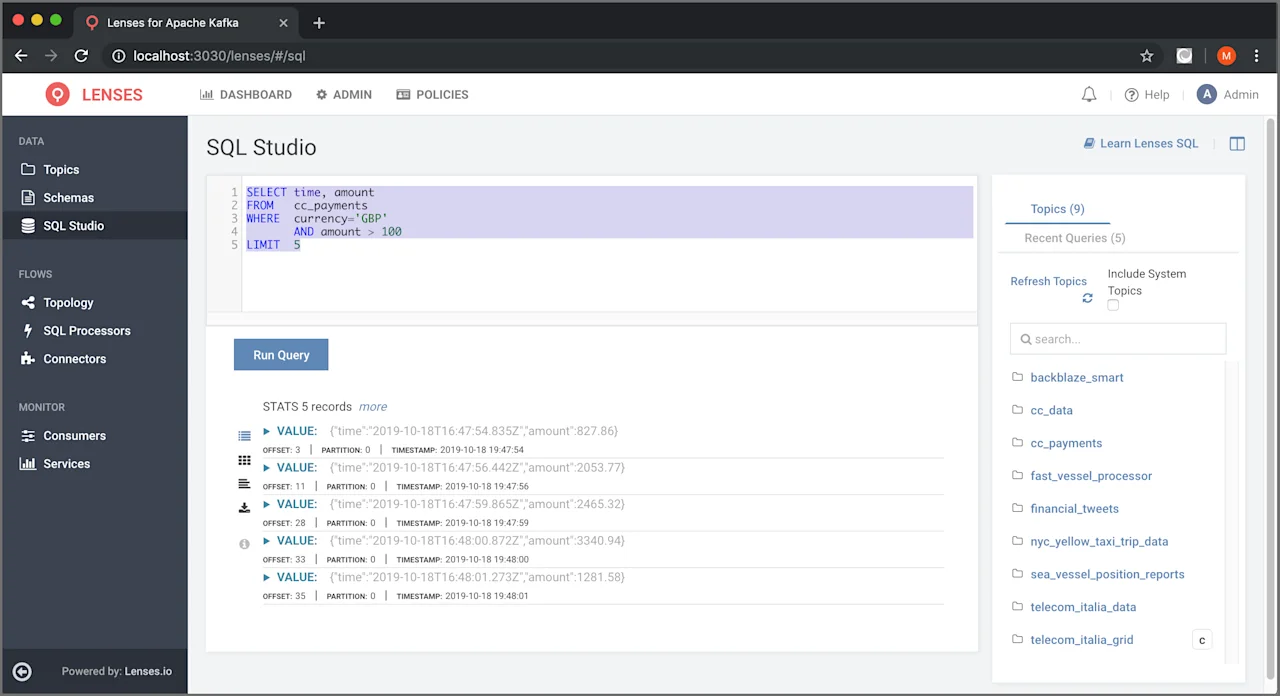
If you are a person who prefers graphical user interfaces, you will find Lenses UI very pleasing and easy to use.
An example
After you login to Lenses Box (http://localhost:3030
admin
SQL Studio
```
SELECT time, amount
FROM   cc_payments
WHERE  currency='GBP'
       AND amount > 100
LIMIT  5
```
After pressing the Run Query
Lenses CLI
The tutorial assumes that you have already installed and configured lenses-cli
lenses-cli
lenses-cli topics
The lenses-cli topics
An example
In order to get 5 records from the cc_payments
```
lenses-cli query --keys --meta "SELECT time, amount
FROM   cc_payments
WHERE  currency='GBP'
       AND amount > 100
LIMIT  5"
```
The --keys
lenses-cli query
The output that you will get will be similar to the following:
```
{
  "key": null,
  "value": {
    "time": "2019-10-18T16:47:54.835Z",
    "amount": 827.86
  },
  "metadata": {
    "timestamp": 1571417274835,
    "__keysize": 16,
    "__valuesize": 0,
    "partition": 0,
    "offset": 3
  }
}
...
```
If you want to get the output in a better format, you can use the jq
jq(1)
jq
```
lenses-cli query --keys --meta "SELECT time, amount
FROM   cc_payments
WHERE  currency='GBP'
       AND amount > 100
LIMIT  5" | jq
```
The output that you will get will be similar to the following:
```
{
  "key": null,
  "value": {
    "time": "2019-10-18T16:47:54.835Z",
    "amount": 827.86
  },
  "metadata": {
    "timestamp": 1571417274835,
    "__keysize": 16,
    "__valuesize": 0,
    "partition": 0,
    "offset": 3
  }
}
...
```
WebSockets Client
In this section you will learn how to use Lenses Data API from a WebSockets client.
This is the only method that you have to know the end point that you want to use in
order to communicate with Lenses. In our case the end point is /api/ws/v2/sql/execute
An example
In the first example we are going to execute the query that follows from the WebSocket
client:
```
SELECT time, amount
FROM   cc_payments
WHERE  currency='GBP'
       AND amount > 100
LIMIT  5
```
The first thing that you will need to do with your WebSockets client is to connect to
Lenses. Without properly connecting to Lenses, you will not be able to issue any of the
presented commands. What you need to connect to Lenses from a WebSocket client is the
authentication token which should be included in the message. One way of getting the
authentication token is by executing the following curl(1)
```
curl -H 'Content-Type: application/json' --request POST --data
    '{"user":"admin","password":"admin"}' http://localhost:3030/api/login
```
The output of that command will be the authentication token – in this case the returned
value was 16a8b2dd-b2d0-449e-8203-9dd51d7950cf
that we will send to Lenses from the WebSocket client – in your examples you will need
to use your own authentication token.
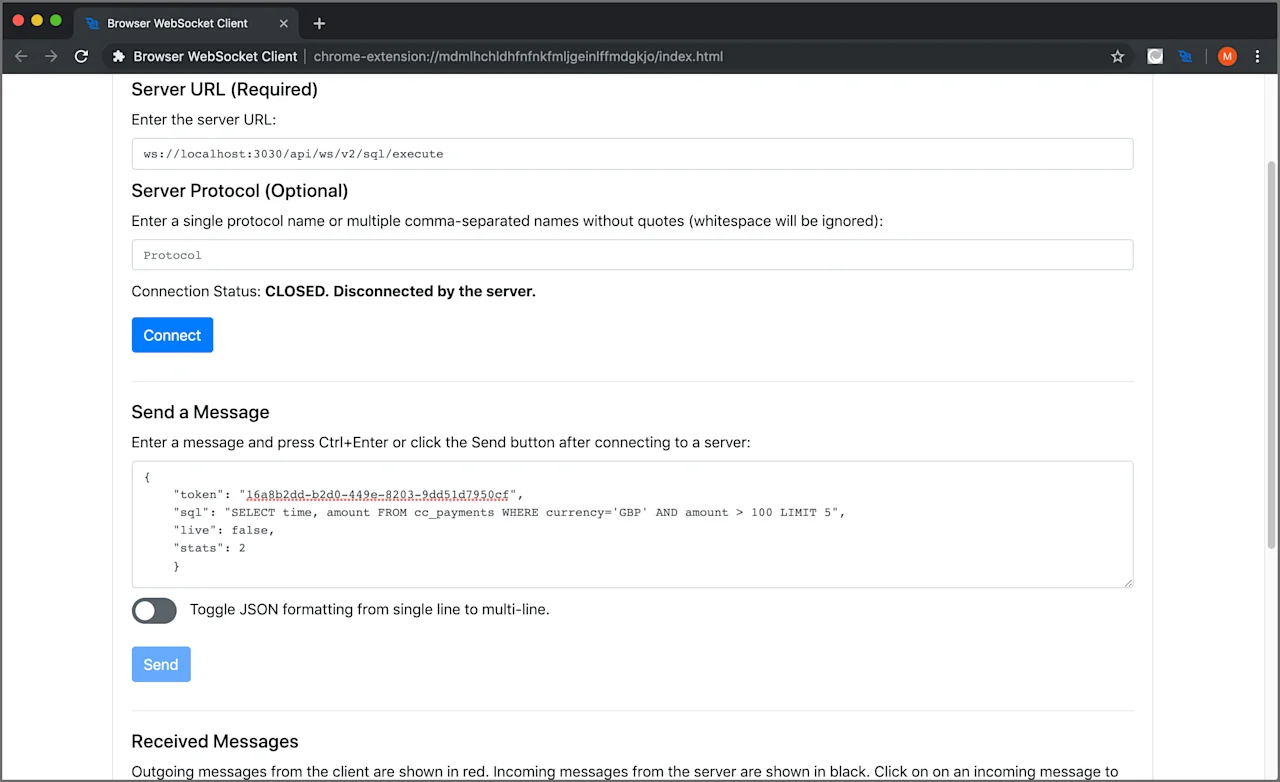
Then you will need to create the message,
which will be in JSON format:
```
{
  "token": "16a8b2dd-b2d0-449e-8203-9dd51d7950cf",
  "sql": "SELECT time, amount FROM cc_payments WHERE currency='GBP' AND
  amount > 100 LIMIT 5",
  "live": false,
  "stats": 2
}
```
The value of token
curl(1)
sql
the SQL query that we want to execute. The value of live
boolean
false
is used for regular queries whereas the true
Last, the value of stats
The last thing you will need is a WebSocket client, which in this case, it will be a Google
Chrome extension called
Browser WebSocket client.
You will need to install it before using it unless you already have a WebSocket client that
you know how to use. After that, you will see a small blue icon on the upper right corner of
Google Chrome, which is the same with the one you saw when you installed the Browser WebSocket
client. If you press it, the Browser WebSocket client will be activated and you will be able
to issue your commands.
The initial screen of the extension will be as follows:
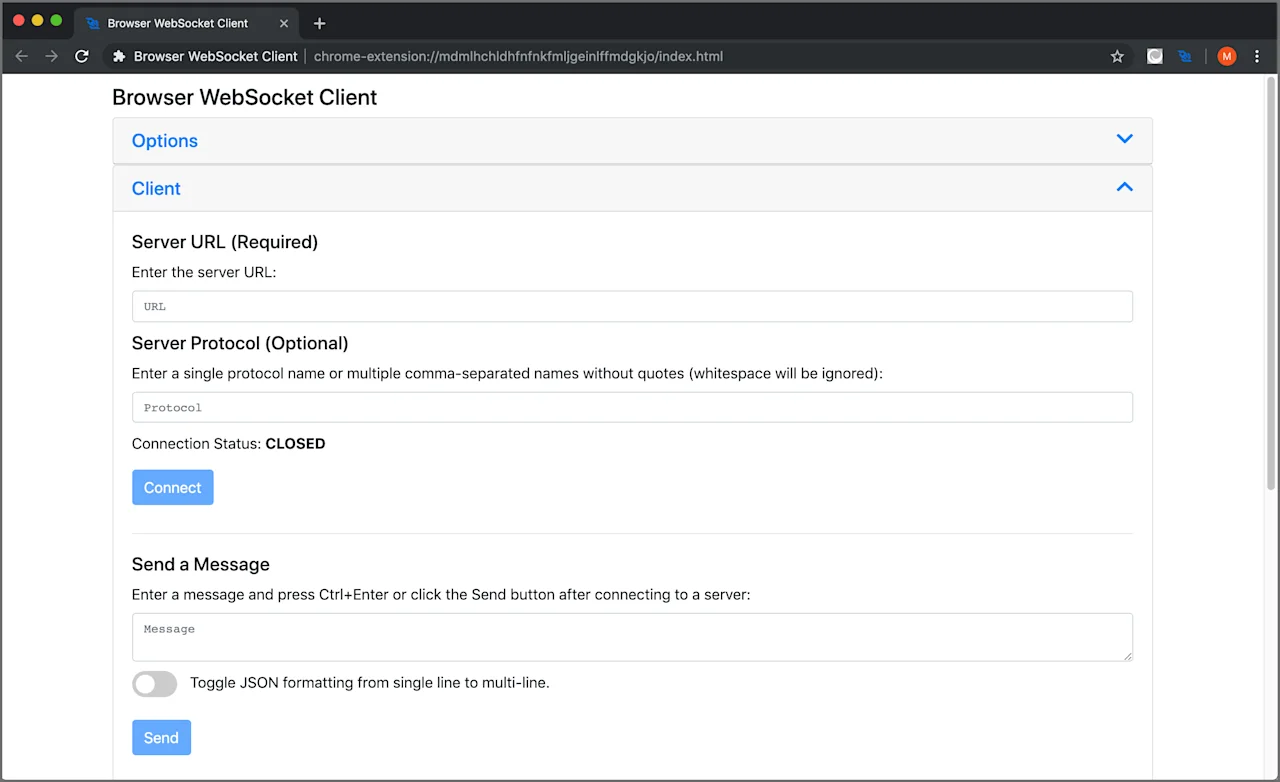
You will have to enter the WebSockets address on the Server URL
Send a Message
Server URL
ws://localhost:3030/api/ws/v2/sql/execute
and text in the Send a Message
After that, you will need to press the Connect
Send
You will see the results of your message in the Received Messages
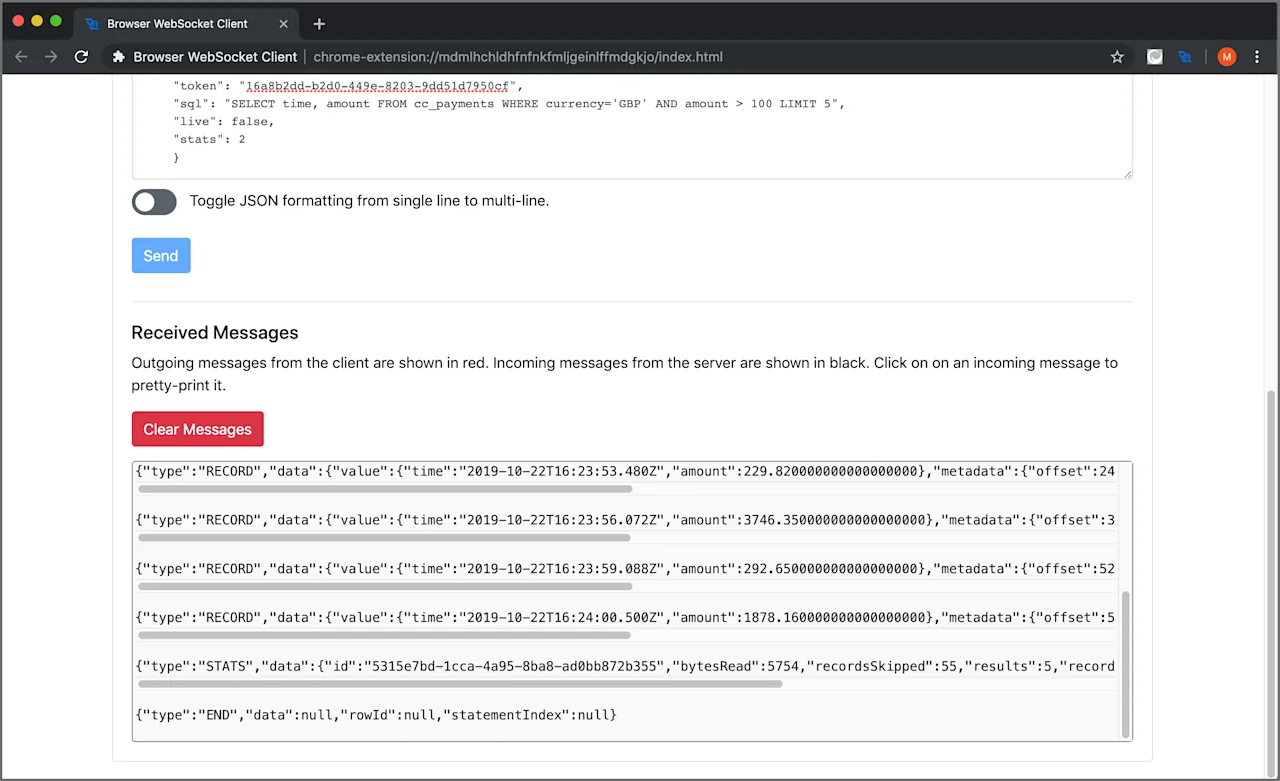
As this is not a live continuous query, the connection will automatically close
after the query finishes. In order to execute another query, you will need to
press the Connect
Send
Another example
The second example will present a live continuous query. The difference between a
live continuous query and a regular one is that a live query will continue trying
to get data and will never return, which means that you will have to end it on your
own. This can be very handy when you are processing a Kafka topic will live data.
This time, the message that will be sent will be the following:
```
{
  "token": "49670c77-3b6b-45a6-ade4-6feb0091b4c1",
  "sql": "SELECT time, amount FROM cc_payments WHERE amount > 5009.5",
  "live": true,
  "stats": 2000
}
```
Once again, you will see the results of your live continuous query in theReceived Messages
are not any records that match the parameters of the query. However, when
such records are inserted on the Kafka topic, they will automatically appear in
the output.
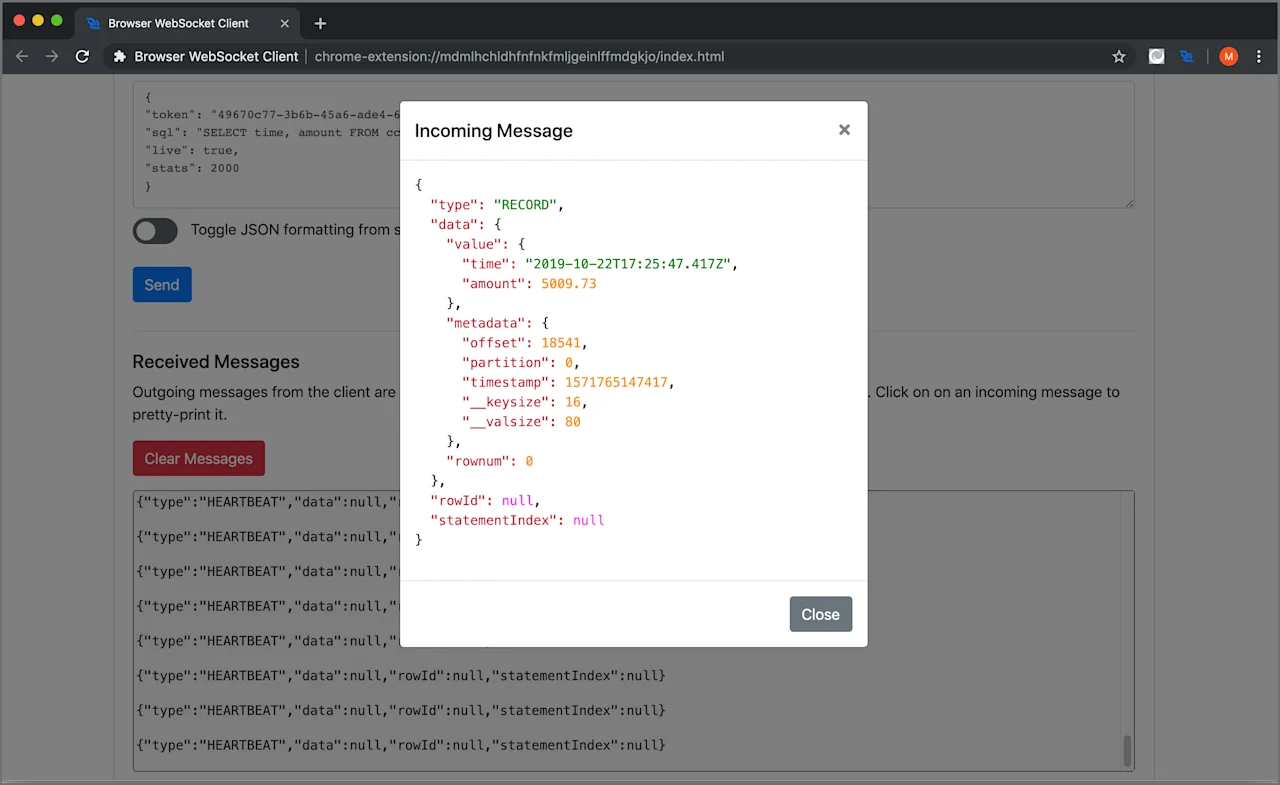
The {"type":"HEARTBEAT","data":null,"rowId":null,"statementIndex":null}
see in the output are HEARTBEAT
until you end it manually.
Notice that if you put any aggregations in a live continuous query, you will get
the following kind of error message:
"data": "LIVE mode is not supported on aggregated queries",
Next Steps
Try Lenses for yourself with the free “all-in-one” Kafka+Lenses Box.
You can also learn more about exploring your data with Lenses from our usecase page