
So you gave our Lenses Box a spin and were sold immediately, now you are ready
to run Lenses against your own Kafka cluster. We actually get this a lot! As it
happens your cluster is on Azure, maybe even on Azure HDInsight; Microsoft after
all, a few days ago, announced the general availability of Kafka 1.0 for
HDInsight.
As always, we’ve got you covered.
In this article we’ll go through a simple demonstration on how to setup Lenses
on Azure and connect it to a HDInsight Kafka cluster, maybe even throw in a
Schema Registry instance for good measure. Note that I am an Azure beginner
myself, so many clouds to learn, so little time. Luckily Lenses is designed to
work effortlessly with any Kafka installation. We love, support and learn from all vendors.
The main prerequisite for this guide to work, is obviously to have a Kafka
installation. Although beyond our scope, let’s have a brief overview of creating
one with HDInsight. Azure offers $200 or €170 in free credits for new users, so
you might be tempted to give this a try even if you aren’t already on Azure.
Now would also be a good time to request a Lenses enterprise trial for 4 brokers – if you follow this guide to the letter, this is how many brokers you will end up needing.
Create a Kafka Cluster (apply as needed)
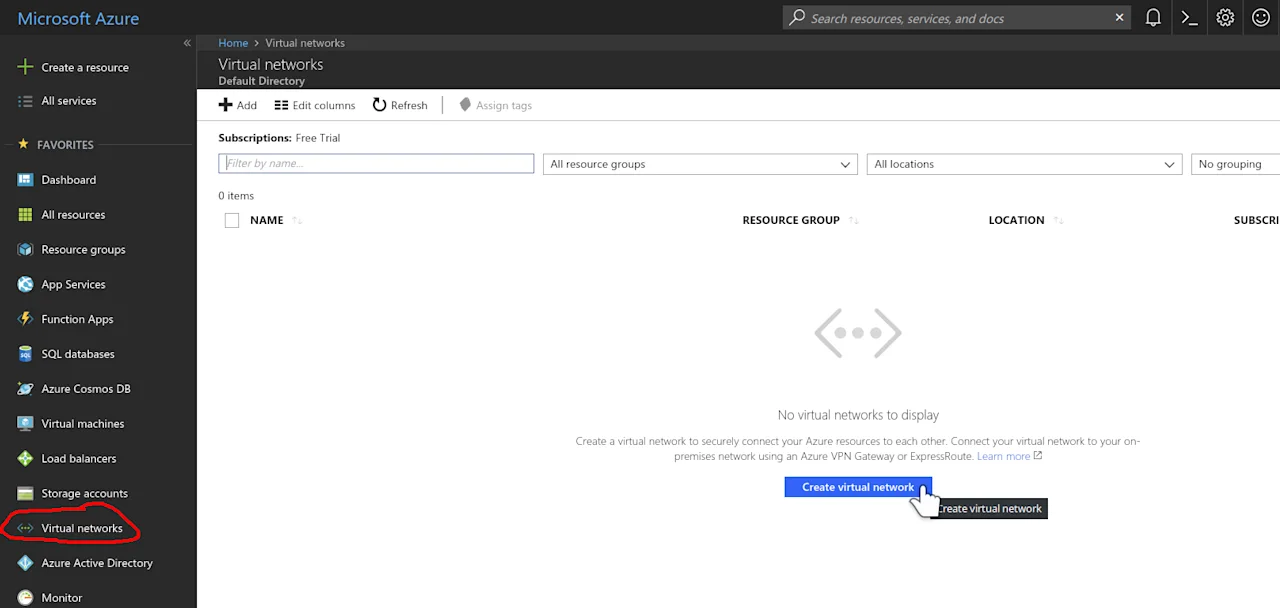
The first step if you haven’t done already so, is to create a resource group in
your Azure account and add a virtual network to it. The image below is for
reference.
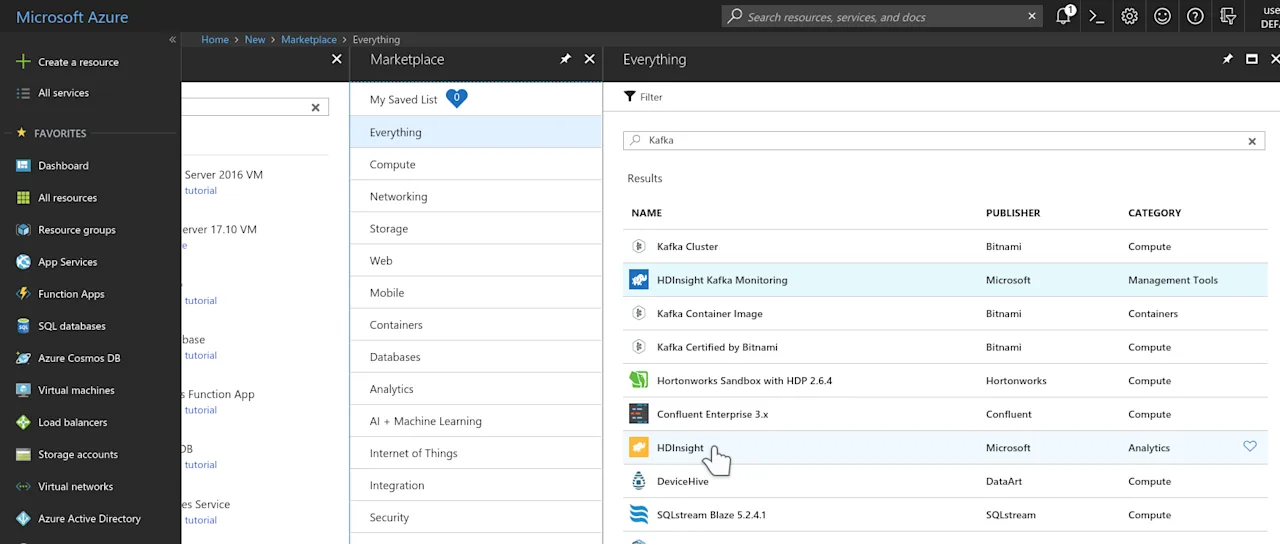
Once you have a virtual network, you can create a Kafka Cluster inside
it. HDInsight make this too easy, almost next, next, next, finish easy. To
create your Kafka cluster, press Create a resource, search for Kafka
and select HDInsight from the results.
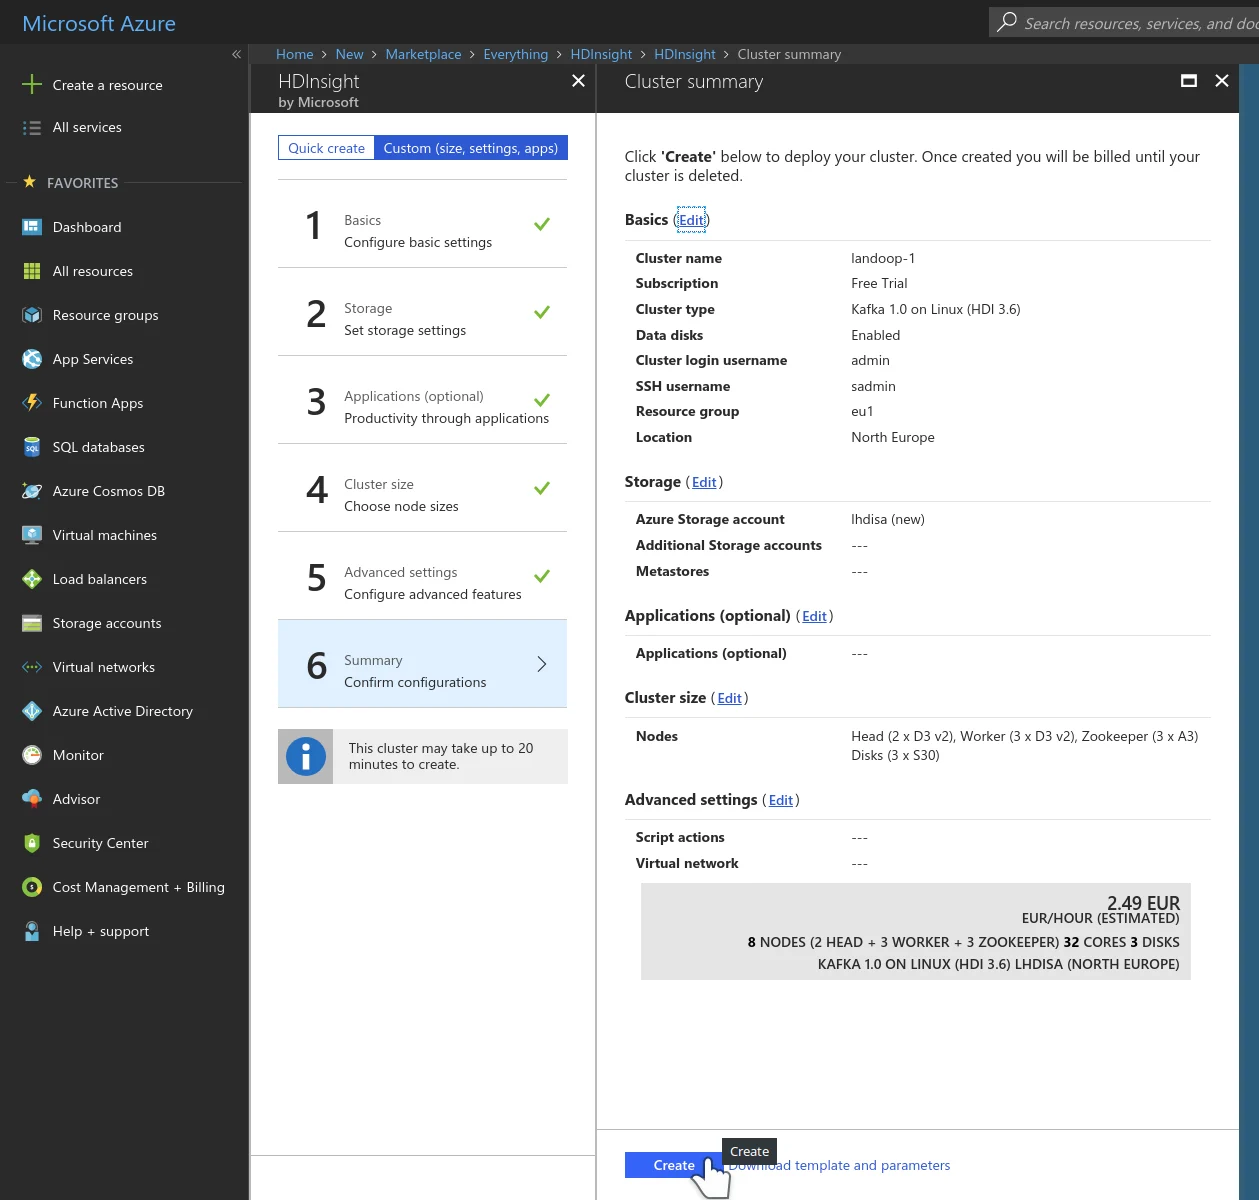
Once you press create, you’ll be presented with a three to six step guide. At
the first step it’s important to set the cluster type as Kafka 1.0 on Linux
and select the resource group your virtual network lies in. At step four you
will choose the size of your cluster. At step five it’s important to select the
virtual network you created earlier. This is a simple but important step to simplify the networking, i.e.
we can install Lenses into the same VNET so it can communicate with the HDInsight cluster without any further
networking requirements. The sixth step (summary) should look similar to the
one below.
Once you press Create you can take a short break, the cluster needs some time
to reach operational status. If you are bored, you can glance at the creation
process in the Azure dashboard. It can be rather soothing.
Create a VM and install Lenses
We are going to run Lenses via the landoop/lenses
setup, orchestration comes free from the container management engine (just
docker for the purpose of this guide) and upgrades are friction-less.
Let’s start by creating an Ubuntu 18.04 VM. Our image can actually run on
most if not all Linux distributions that offer docker support; Ubuntu seems
like a popular choice for guides.
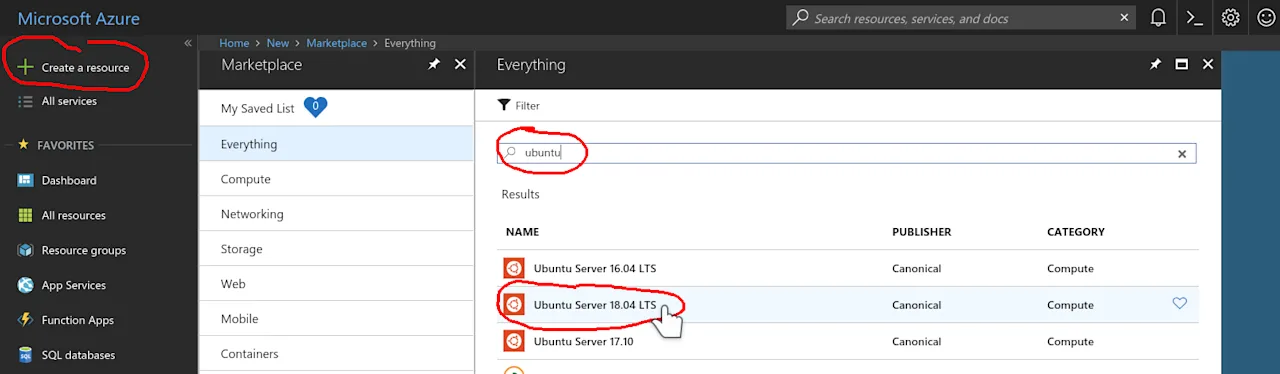
In the Azure dashboard select Create a resource, search for ubuntu, from
the result list select Ubuntu Server 18.04 LTS and press create.
A four step guide will initiate. At the first step make sure to use the same
resource group and location as your Kafka cluster. Lenses —and most Kafka
applications— work better the more close they are to the Kafka cluster. At the
second step I’d suggest to choose a B2ms SKU. This one comes with 2 vCPUs and
8GB of RAM. It should be good for a small to medium cluster. In our case it will
even let us run a few more things than just Lenses. At the
fourth step make sure to select the same virtual network as your Kafka
cluster. It would be definitely useful to open a couple ports as well, one for
ssh (port 22
8080
other port above 1024. Feel free to open a different one. Once our VM is
created, we can ssh into it as we will see shortly.
Now, let’s talk a bit about the Lenses setup. Lenses needs access to the brokers,
just as any Kafka client would and access to zookeeper since some administration
operations can only happen via it. Strongly recommended is JMX access to the
brokers, as it let us apply our operational knowledge to your cluster metrics,
provide metric overviews, calculate consumer lags and alert you on operational
and functional incidents on-time or even proactively.
If you do use Kafka Connect and/or a Schema Registry implementation, Lenses can
access these as well, to provide schema and connector management, as well as
encoding and decoding AVRO data. JMX access to all services apart from the
brokers is supported, though it is optional.
HDInsight Kafka does provide brokers with JMX enabled and zookeeper. For the
brokers all that needed is a list of bootstrap servers. For zookeeper the
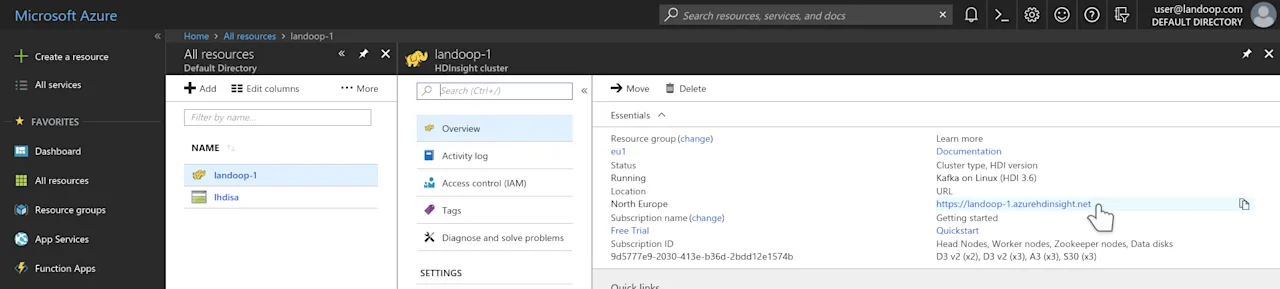
complete list of zookeeper nodes is required. How to get all these? Visit your
cluster’s administration page. It may be reached via the resource’s dashboard.
In the administration interface you will find information for all the service
instances that form your Kafka cluster. We need only a couple of broker
addresses and all our zookeeper addresses.
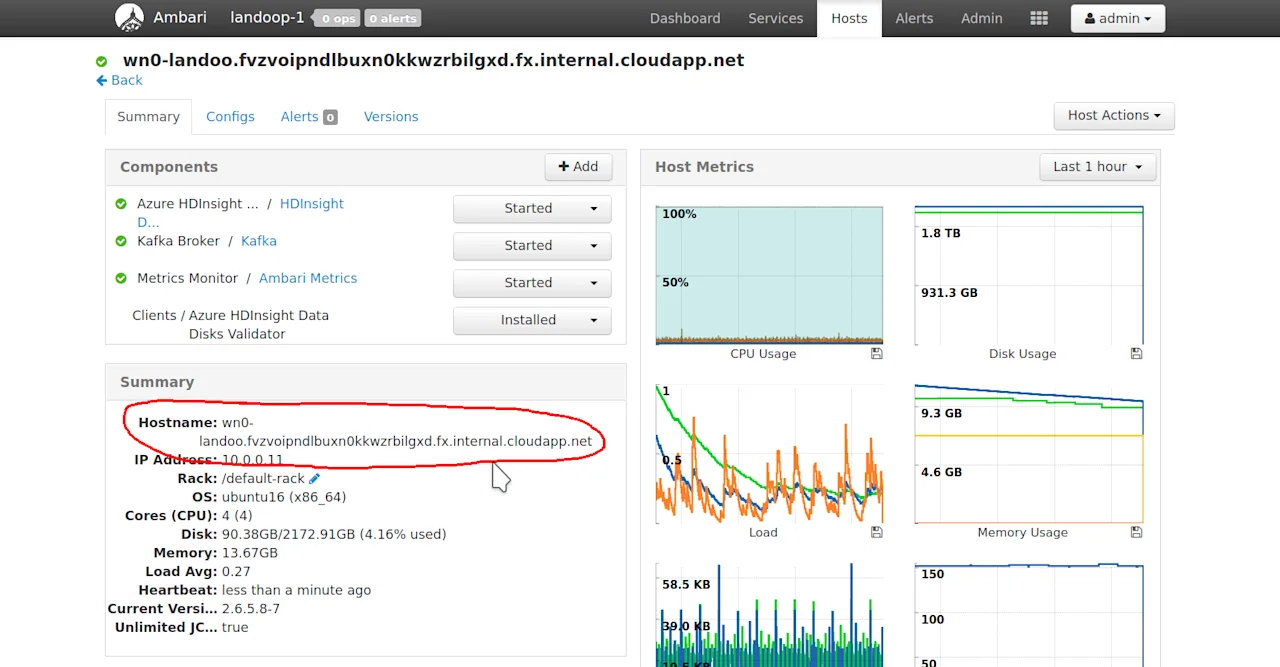
In my setup there are three brokers and three zookeepers as well.
For reference, this is the list I wrote down:
```
# A couple Brokers
- wn0-landoo.fvzvoipndlbuxn0kkwzrbilgxd.fx.internal.cloudapp.net:9092
- wn1-landoo.fvzvoipndlbuxn0kkwzrbilgxd.fx.internal.cloudapp.net:9092

# All Zookeepers
- zk0-landoo.fvzvoipndlbuxn0kkwzrbilgxd.fx.internal.cloudapp.net:2181
- zk1-landoo.fvzvoipndlbuxn0kkwzrbilgxd.fx.internal.cloudapp.net:2181
- zk4-landoo.fvzvoipndlbuxn0kkwzrbilgxd.fx.internal.cloudapp.net:2181
```
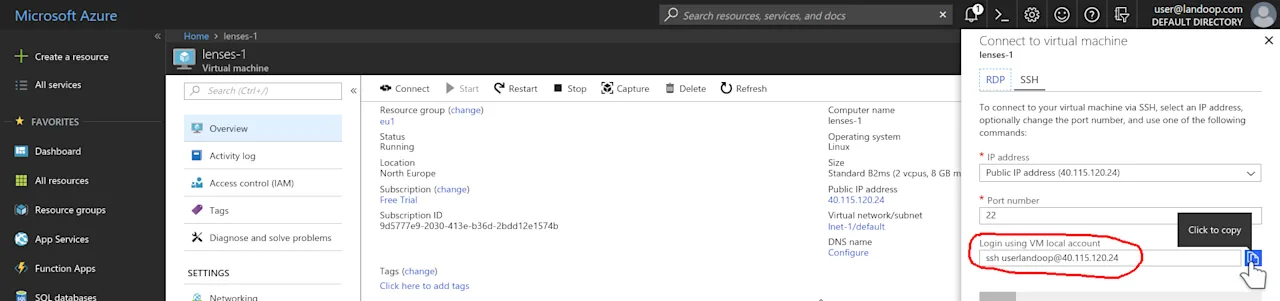
So now we can ssh into our freshly minted virtual machine and run Lenses. No
good guide goes without running some commands in a terminal after all. You may
find your ssh connection details in the VM’s dashboard.
Once in, you should install docker and maybe an editor of your choice. For the purpose
of this guide, it is ok and recommended to use the root user. The Lenses docker image
if run without an enforced user, will drop to user nobody before starting Lenses.
```
$ sudo su
$ apt-get update
$ apt-get install docker.io emacs-nox vim nano
```
The next step is to create a docker environment file which will include
Lenses’ configuration. Let’s name it lenses.env
the contents below, obviously adjusted for your cluster.
```
LENSES_PORT=8080
LENSES_KAFKA_BROKERS=PLAINTEXT://wn0-landoo.fvzvoipndlbuxn0kkwzrbilgxd.fx.internal.cloudapp.net:9092
LENSES_ZOOKEEPER_HOSTS=[{url:"zk0-
landoo.fvzvoipndlbuxn0kkwzrbilgxd.fx.internal.cloudapp.net:2181"},{url:"zk1-
landoo.fvzvoipndlbuxn0kkwzrbilgxd.fx.internal.cloudapp.net"},{url:"zk4-
landoo.fvzvoipndlbuxn0kkwzrbilgxd.fx.internal.cloudapp.net"}]
LENSES_SECURITY_GROUPS=[{"name": "adminGroup", "roles": ["admin", "write",
"read"]}]
LENSES_SECURITY_USERS=[{"username": "admin", "password": "admin",
"displayname": "Lenses Admin", "groups": ["adminGroup"]}]
LENSES_SECURITY_MODE=BASIC
LICENSE={"source":...}
```
What does the above configuration set? It sets the Lenses port to 8080, sets a
broker to make the initial connection to (a bootstrap server in Kafka lingo),
the list of all the zookeeper nodes, a security group with admin rights and a
user (admin/admin) that belongs to this security group and we’ll use to
login. Also there is the license we sent you when
you applied for a Lenses enterprise trial.
If it hasn’t arrived yet in your mailbox, please wait. A real person is probably
issuing it and sending it to you right now. At Lenses.io we automate many things,
but not our customer relationships.
A note about lenses.env
with. All content should be in a single line, without quotes or spaces around
the assignment (KEY=VALUE
LENSES_ZOOKEEPER_HOSTS
so long. They come in handy though for quick setups like this.
Once you are happy with your environment file, start Lenses:
```
docker run --name=lenses --rm --env-file=lenses.env --net=host
landoop/lenses
```
That’s it. Visit your VM’s IP address —the one you ssh’d to— at the port you
opened and configured Lenses to listen at. Something like
http://xxx.xxx.xxx.xxx:8080. Login with admin
admin
your first Lenses setup in Microsoft Azure.
If your cluster is new, Lenses will seem pretty empty. Let’s do something
about that!
Playtime
Everything we did up to now was pretty basic. Setup a Kafka cluster and a
virtual machine through a web interface, install docker, configure and start
Lenses. Now is time for some fun.
As it happens, HDInsight does not yet provide a Kafka Connect cluster, neither a
Schema Registry implementation. Once again, Lenses.io has you covered. Kindly
please stop the Lenses docker container by pressing CTRL+C.
As it stands, apart from the best Streaming Platform, we also have the best
Kafka development environments, our twin docker images landoop/fast-data-dev
and landoop/kafka-lenses-dev
used for so much more than just a development environment.
Let’s create a new docker environment file named kafka-extras.env
contents below. Once again, please adjust for your own cluster.
```
FORWARDLOGS=0
RUNTESTS=0
SAMPLEDATA=0
ZK_PORT=0
BROKER_PORT=0
REST_PORT=0
CONNECT_BOOTSTRAP_SERVERS=PLAINTEXT://wn0-landoo.fvzvoipndlbuxn0kkwzrbilgxd.fx.internal.cloudapp.net:9092
CONNECT_KEY_CONVERTER_SCHEMA_REGISTRY_URL=http://localhost:8081
CONNECT_VALUE_CONVERTER_SCHEMA_REGISTRY_URL=http://localhost:8081
CONNECT_CONFIG_STORAGE_REPLICATION_FACTOR=3
CONNECT_OFFSET_STORAGE_REPLICATION_FACTOR=3
CONNECT_STATUS_STORAGE_REPLICATION_FACTOR=3
SCHEMA_REGISTRY_KAFKASTORE_BOOTSTRAP_SERVERS=PLAINTEXT://wn0-landoo.fvzvoipndlbuxn0kkwzrbilgxd.fx.internal.cloudapp.net:9092
```
The only things you should have to change are the bootstrap servers. If you
created your cluster with less than three brokers, please also adjust the
replication factor settings to match your cluster size. If your cluster size is
larger than three, no adjustments are needed.
What the above file essentially does, is disable the services and features we
don’t want, then setup the features we do want (Kafka Connect and Schema
Registry) to use the HDInsight Kafka cluster.
Once ready, start landoop/fast-data-dev
to 1.0, the same as our brokers, just in case.
```
docker run -d --name=kafka-extras --net=host --env-file=kafka-extras.env
landoop/fast-data-dev:1.0
```
Although it’s in the background and not directly visible, this will take a few
minutes to start. It’s a small inefficiency of the image when not used in a
standard way that we will improve in the future.
Now let’s add the endpoints of Kafka Connect and Schema Registry to ourlenses.env
section. You don’t have to adjust these values, just copy and paste. As said, in
docker environment files entries can not span across lines:
```
LENSES_SCHEMA_REGISTRY_URLS=
[{url:"http://localhost:8081",jmx:"localhost:9582"}]
LENSES_CONNECT_CLUSTERS=[{name:"fastdata",urls:
[{url:"http://localhost:8083",jmx:"localhost:9584"}],statuses:"connect-
statuses",configs:"connect-configs",offsets:"connect-offsets"}]
```
Now start Lenses again.
```
docker run --name=lenses --rm --env-file=lenses.env --net=host
landoop/lenses
```
Lenses may fail to start if Connect has not already started. It’s ok, wait a bit
and restart it. It may seem counter-intuitive at first but this approach is
called fail fast and fail hard. This way you get a clear signal when there is
a problem with your configuration —in this case connect topics do not exist, so
they might as well be wrong— instead of getting a semi-working environment that
you need to debug.
Once Lenses starts, things seem so much more interesting.
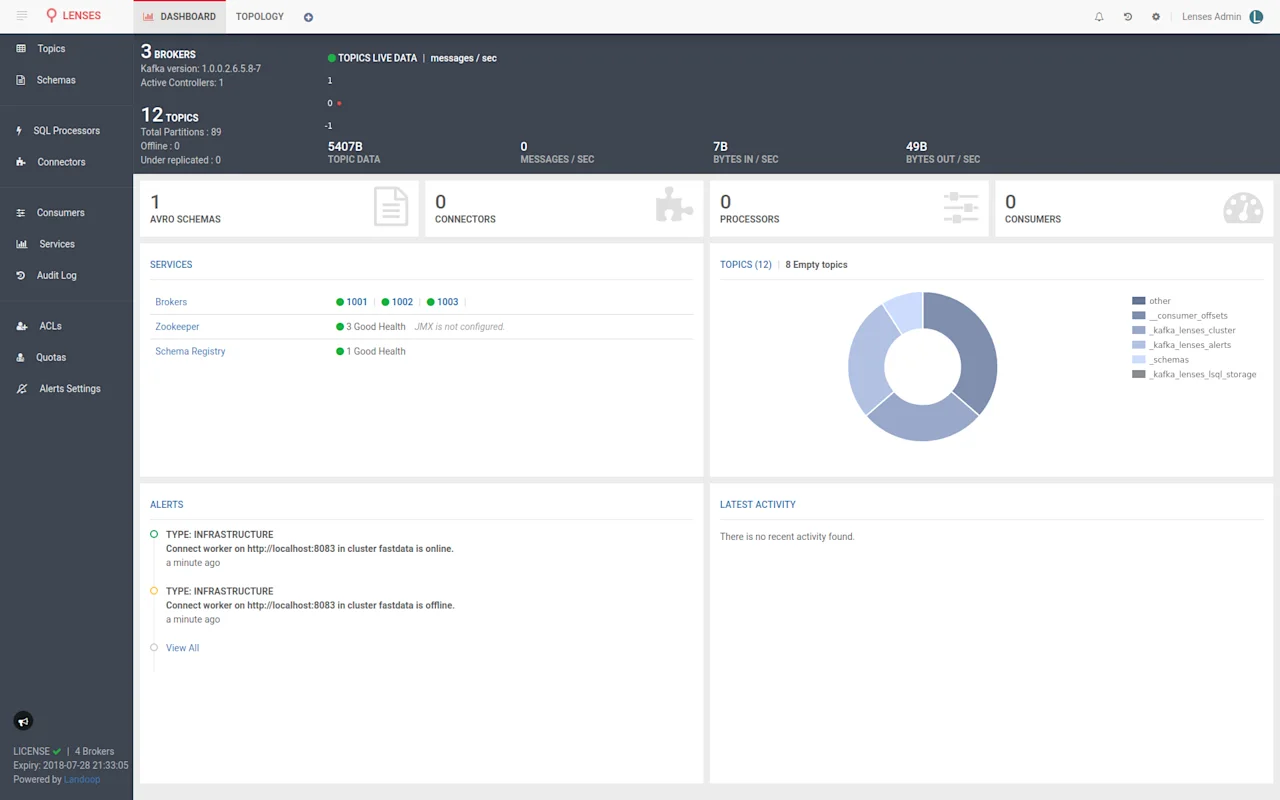
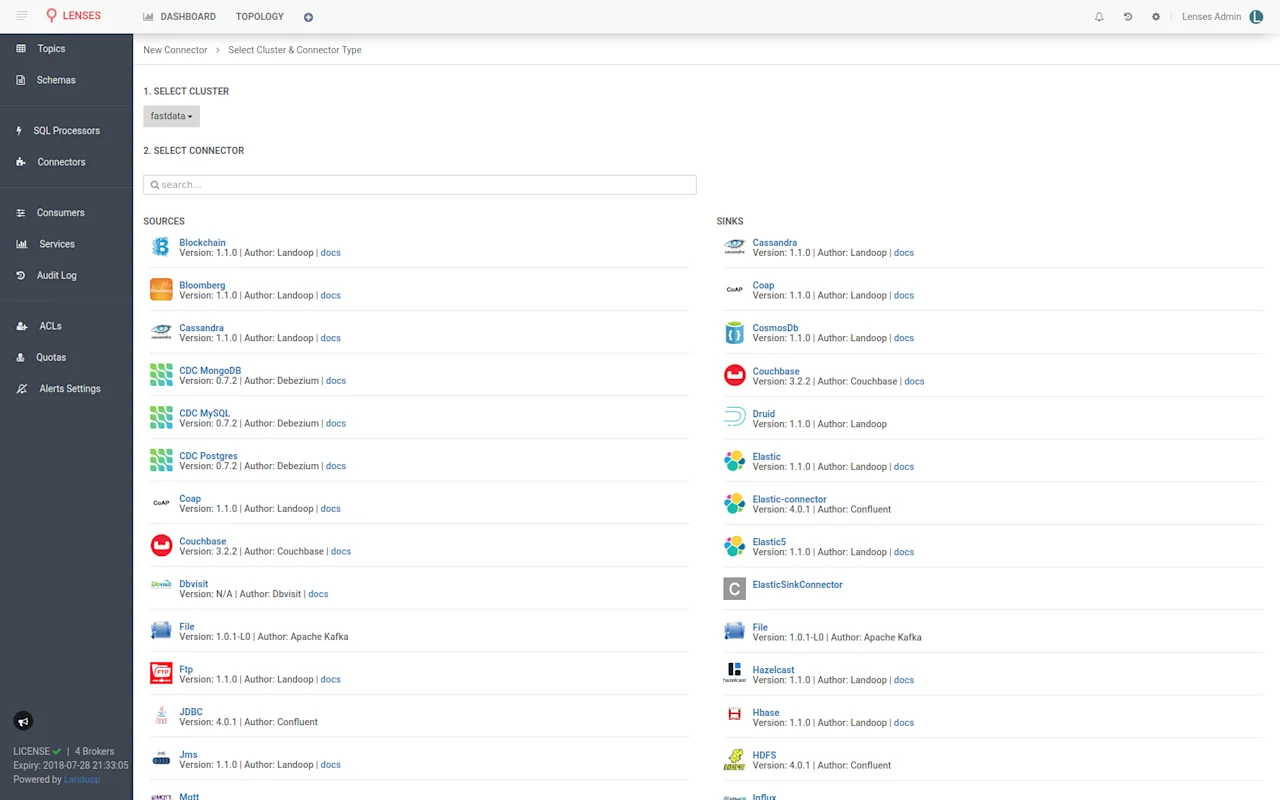
If you visit the connectors tab, you will find the Kafka Connect we set up,
offering a multitude of connectors, most coming from Landoop of course; our open
source Stream Reactor collection of connectors. Not bad for a couple minutes of
work, right?
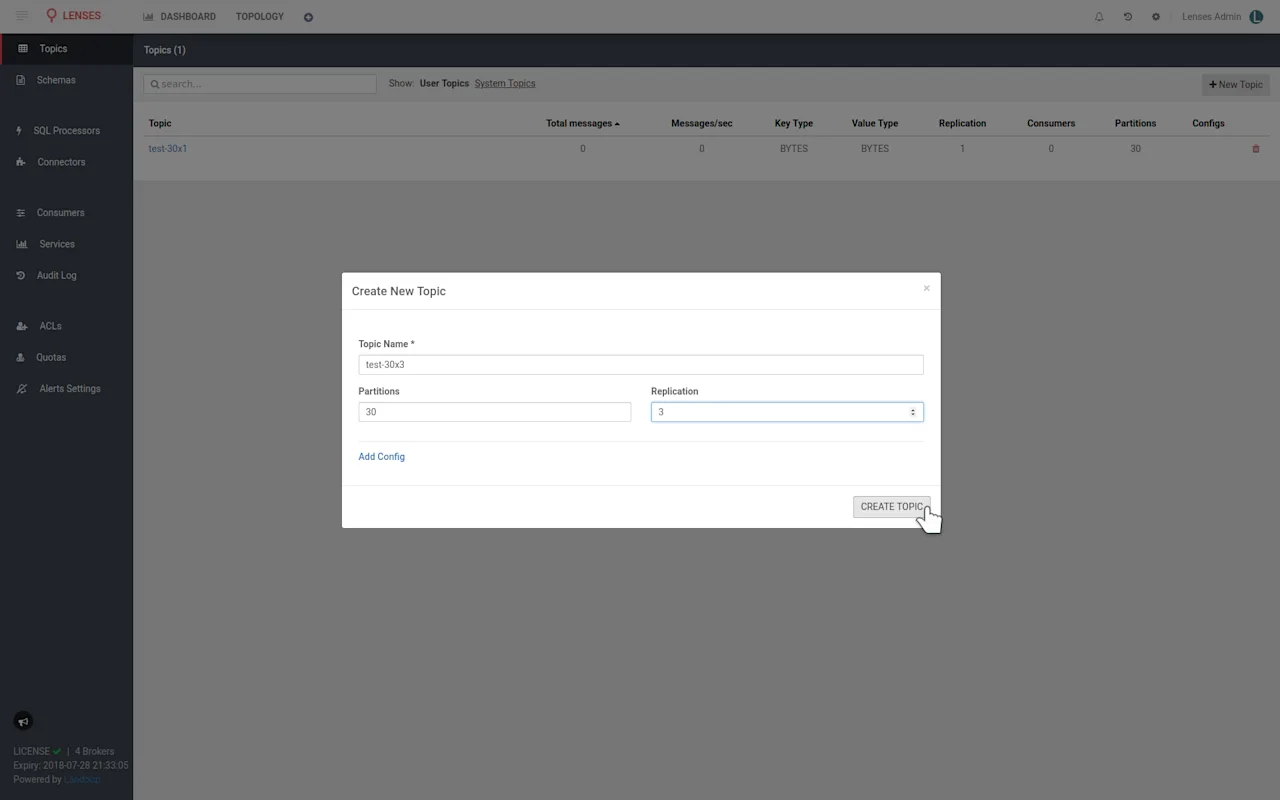
Where can we go from here? Let’s test the performance of our cluster. Create two
topics to boot, test-30x1
test-30x3
partitions and no replication, whilst the latter will have thirty partitions as
well and a replication factor of three. You can create topics easily from within
Lenses.

Now we can use them for testing. Open a second connection to your VM, or stop
Lenses with CTRL+C and restart it in the background. That way you will free
your current terminal.
docker run --name=lenses -d --env-file=lenses.env --net=host landoop/lenses
Another use of our development docker images, is that they offer all Kafka
command line tools, even provide autocompletion for the most common ones. They
truly are Kafka Swiss army knifes. Let’s get a terminal inside a fast-data-dev
container:
docker run --rm -it --net=host landoop/fast-data-dev:1.0 bash
Now we can use kafka-producer-perf-test
With any benchmark should come a disclaimer. If you don’t see one you can safely
dispose the benchmark results. Actually even if you see one, for most benchmarks
it is safe to ignore the results. Ours cannot be the exception. Whilst we will
get a throughput rate for our installation, we can’t know without more
exhaustive testing if there is a significant bottleneck and where it lies, or
how a real world load would perform. Furthermore a proper benchmark should
run for hours if not days; sustained performance is a big challenge for any
system.
Anyhow, of to our benchmarks! You can use the commands below to test your
cluster. First we will test producing to a topic without replication. Note that
I cheated a bit in the command; instead of the long hostname for the broker, I
use it’s IP address. Adjust for your own setup and feel free to use the broker’s
hostname.
```
kafka-producer-perf-test --producer-props bootstrap.servers=10.0.0.11:9092 -
-topic test-30x1 --record-size 500 --num-records 10000000 --throughput
1000000
```
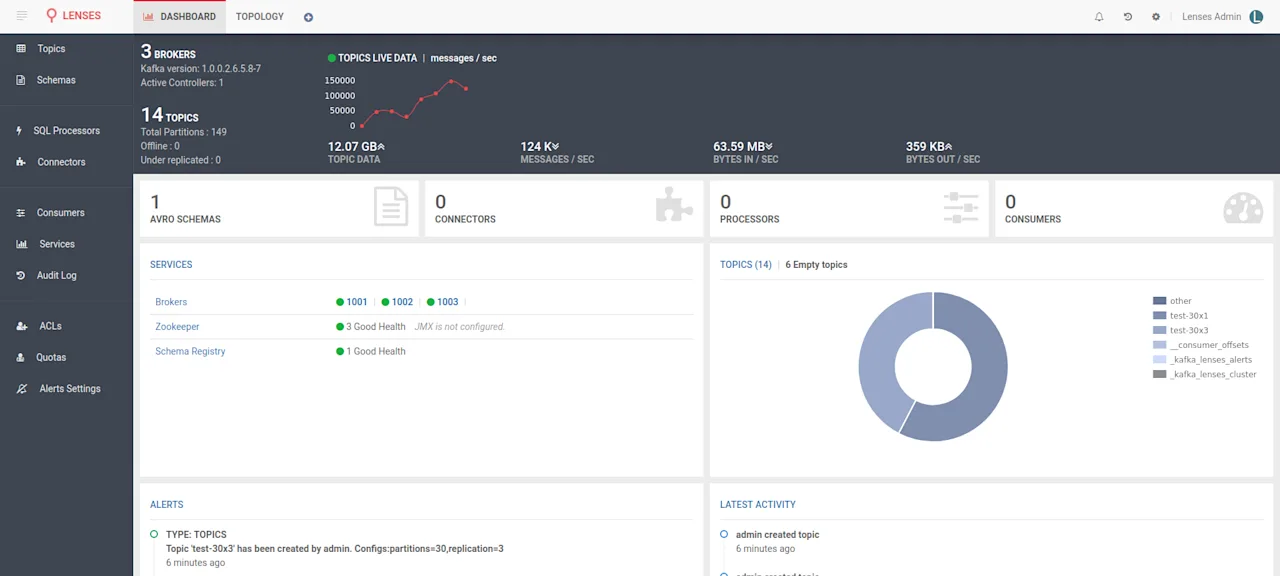
What the command above does, is produce 10 million records of 500 bytes each at
a rate no higher that 1 million records per second. If you visit Lenses you
should see the data pouring in. Please note that Lenses display the reported
5-min weighted average from the brokers which provides a better overview of the
cluster status. Our Kafka monitoring solution that comes as part of a Lenses enterprise license provides instant rates and many more metrics, down to the partition level.
Now let’s test with replication. Again, remember to adjust your broker’s address
if needed.
```
kafka-producer-perf-test --producer-props bootstrap.servers=10.0.0.11:9092 -
-topic test-30x3 --record-size 500 --num-records 10000000 --throughput
1000000
```
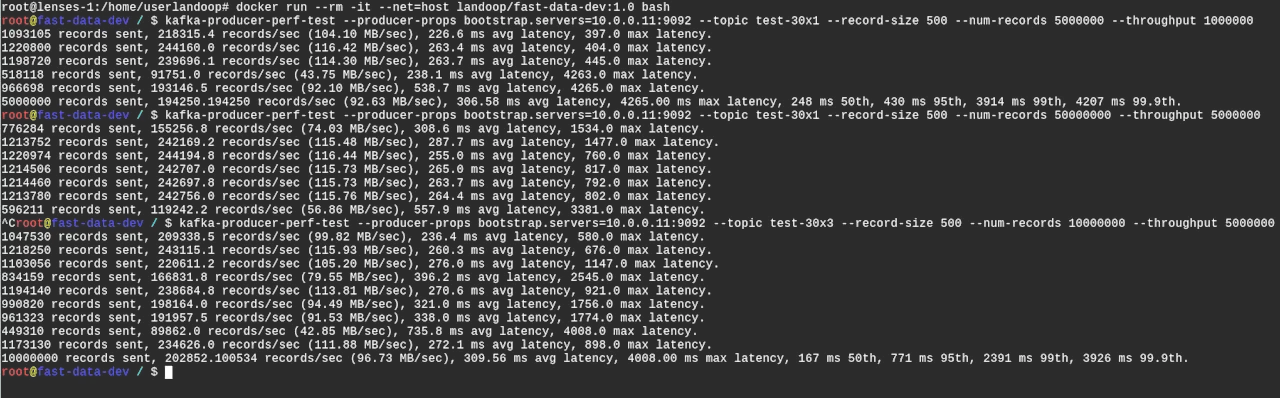
The results are quite impressive on first look. Replication doesn’t seem to make
a big difference. This could be an indication that our producer may was the
bottleneck in the first test.
Now, since we “tested” the produce performance, let’s have a look at the consume
rates as well. There is a complementary kafka-consumer-perf-test
I think we’ve graduated past that. Let’s use Kafka Connect instead!
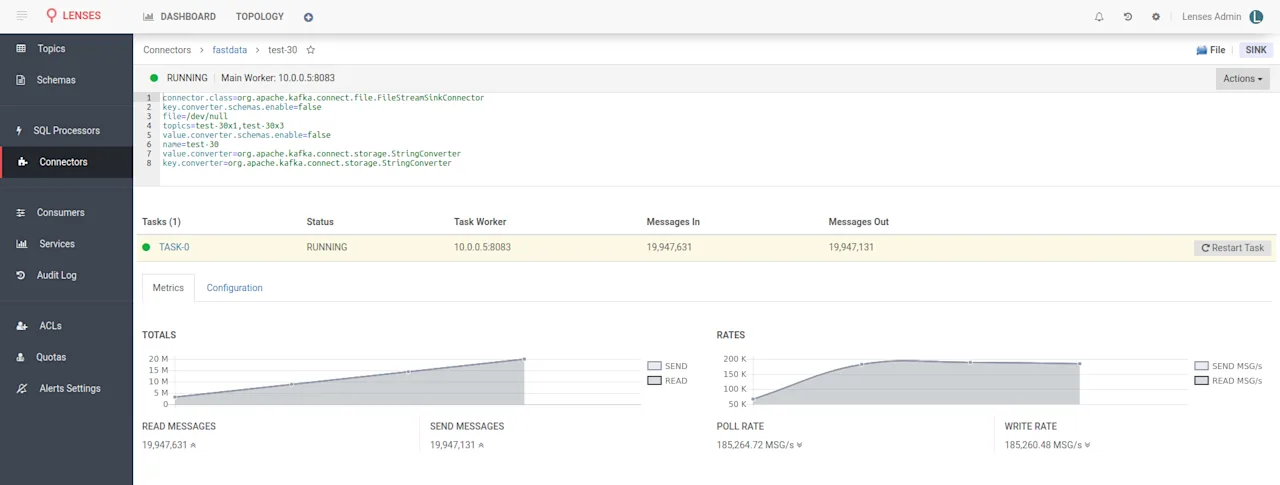
In Lenses, visit the connectors tab, select new and from the source list
(right) select the FileStream sink. Sinks are called the connectors that siphon
data out of Kafka. Copy these settings in the connector configuration:
```
name=test
connector.class=org.apache.kafka.connect.file.FileStreamSinkConnector
topics=test-30x1,test-30x3
file=/dev/null
value.converter=org.apache.kafka.connect.storage.StringConverter
key.converter=org.apache.kafka.connect.storage.StringConverter
```

The above configuration set the filestream connector to read records from topics
test-30x1 and test-30x3 and write them to file /dev/null
this is a special file in POSIX systems that discards any data written to it. It
will make sure our disk isn’t a bottleneck to the connector performance and also
protect us from filling our disk. The converter options are there because by
default the Kafka Connect setup within our docker images is set to work with
AVRO data. If your data are JSON, binary or something else, you have to
configure an appropriate converter class. In our case, the data are random
strings.
Wait a bit for the connector to start and you will be able to see metrics within
Lenses. The performance is similar to the produce one. That’s a relief.
Epilogue
That’s all fine readers. In less than an hour you managed to setup a Kafka
Cluster, Lenses, Schema Registry, Kafka Connect, produce and consume data and
even setup a connector; the Lenses way! I hope you enjoyed some bits or even
this whole guide.
Till the next blog!