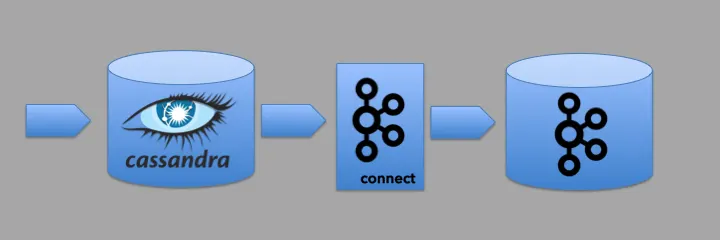
Mike Barlotta, Agile Data Engineer at WalmartLabs introduces how Kafka Connect and
Stream Reactor can be leveraged to bring data from Cassandra into Apache Kafka.
I wrote this blog many years ago, when I first started writing connectors. The time has moved on, but Kafka Connect remains a staple of the Kafka Ecosystem. Lenses continues to build and support our Kafka Connectors, but with the emergence of CDC. Source connectors for source systems are hard, but luckily, Debezium has taken up the mantle.
If you want to source data from Cassandra or other database systems,, we recommend using CDC with the Debezium Connector for Cassandra.
They are still Connectors, so you can manage and deploy with Lenses DevEx. Lenses 6.0 is designed to let you work with multiple Apache Kafka clusters at once, with a free community edition.
In our example we will be capturing data representing a pack (i.e. a large box) of items being shipped. Each pack
is pushed to consumers in JSON format on a Kafka topic.
The Cassandra data model and Cassandra Source connector
Modeling data in Cassandra must be done around the queries that are needed to access the data (see this article for details).
Typically this means that there will be one table for each query and data (in our case about the pack) will be duplicated across multiple tables.
Regardless of the other tables used for the product, the Cassandra Source connector needs a table that will allow us to query data using a time range. The connector is designed around its ability to generate a CQL query based
on configuration. It uses this query to retrieve data from the table that is available within a configurable time
range. Once all of this data has been published, Kafka Connect will mark the upper end of the time range as an offset.
The connector will then query the table for more data using the next time range starting with the date/time stored
in the offset. We will look at how to configure this later; for now we want to focus on the constraints for the table.
Since Cassandra does not support joins, the table we are pulling data from must have all of the data that we want to put onto the Kafka topic. Data in other tables will not be available to Kafka Connect.
In its simplest form a table used by the Cassandra Source connector might look like this:
```
CREATE TABLE IF NOT EXISTS "pack_events" (
    event_id TEXT,
    event_ts TIMESTAMP,
    event_data TEXT,
PRIMARY KEY ((event_id),event_ts));
```
The event_id
event_ts
event_data
This is not the only structure for a table that will work. The table that is queried by the Cassandra Source connector can use numerous columns to represent the partition key and the data. However, the connector requires a single time-based column (either TIMESTAMP or TIMEUUID) in order to work correctly.
This would be an equally valid table for use with the Cassandra Source connector:
```
CREATE TABLE IF NOT EXISTS "kc_events" (
    event_id1 TEXT,
    event_id2 TEXT,
    event_ts TIMEUUID,
    event_data1 TEXT,
    event_data2 TEXT,
PRIMARY KEY ((event_id1, event_id2)));
```
The most efficient way to access data in this table is to query for data with the partition key. This would
allow Cassandra to quickly identify the node containing the data we are interested in.
SELECT * FROM pack_events WHERE event_id = "1234";
However, the Cassandra Source connector has no way of knowing the ids of the data that it will need to publish
to a Kafka topic. That is why it uses a time range.
The reason we cannot use event_ts
(>, >=, <=, <) on the partition key when querying – without these we would not be able to query across date/time
ranges (see this article for details).
There’s just one more thing. If we tried to run the following query it would fail:
```
SELECT * FROM pack_events
WHERE event_ts > ‘2018–01–22T20:28:20.869Z’
AND event_ts <= '2018-01-22T20:28:50.869Z';
```
The connector must supply the ALLOW FILTERING
Cassandra to search all of the nodes in the cluster for the data in the specified time range (see this article for details).
Configuring the connector: KCQL basics
The Lenses.io connectors are configured using Kafka Connect Query Language (KCQL). This provides a concise and
consistent way to configure the connectors (at least the ones from Lenses.io). The KCQL and other basic properties
are provided via a JSON formatted property file.
For the sake of this post, let’s create a file named connect-cassandra-source.json
```
{
  "name": "packs",
  "config": {
   "tasks.max": "1",
   "connector.class": …
```
The name
The connector.class
com.datamountaineer.streamreactor.connect.cassandra.source.CassandraSourceConnector
The next set of configuration (shown below) is used to specify the information needed to connect to the
Cassandra cluster and which keyspace to use.
-
connect.cassandra.contact.points
connect.cassandra.port
connect.cassandra.username
connect.cassandra.password
connect.cassandra.consistency.level
connect.cassandra.key.space
```
{
  "name": "packs",
  "config": {
    "tasks.max": "1",
    "connector.class": "com.datamountaineer.streamreactor.connect.cassandra.source.CassandraSourceConnector",
    "connect.cassandra.contact.points": "localhost",
    "connect.cassandra.port": 9042,
    "connect.cassandra.username": "cassandra",
    "connect.cassandra.password": "cassandra",
    "connect.cassandra.consistency.level": "LOCAL_ONE",
    "connect.cassandra.key.space": "blog",

    "connect.cassandra.import.mode": "incremental",
    "connect.cassandra.kcql": "INSERT INTO test_topic SELECT event_data, event_ts FROM pack_events IGNORE event_ts PK event_ts WITHUNWRAP INCREMENTALMODE=TIMESTAMP",

     …
  }
}
```
There are two values for the connect.cassandra.import.mode
bulk
incremental
bulk
query everything in the table every time that the Kafka Connect polling occurs. We will set this to incremental
The interesting part of the configuration is the connect.cassandra.kcql
tells the connector which table in the Cassandra cluster to use, how to use the columns on the table, and where to
publish the data.
The first part of the KCQL statement tells the connector the name of the Kafka topic where the data will be published.
In our case that is the topic named test_topic
INSERT INTO test_topic
The next part of the KCQL statement tells the connector how to deal with the table. The SELECT/FROM
table to poll with the queries. It also specifies the columns whose values should be retrieved. The column that keeps
track of the date/time must be part of the SELECT
publish to the Kafka topic we can use the IGNORE
SELECT event_data, event_ts FROM pack_events IGNORE event_ts
The next part of the statement, the PK
This is considered the primary key for the connector.
PK event_ts WITHUNWRAP INCREMENTALMODE=“TIMESTAMP”
The INCREMENTALMODE
PK
TIMESTAMP
TIMEUUID
Finally, the WITHUNWRAP
For example, if we had the following value in the event_data column:
{ “foo”:“bar” }
We would want to publish this as seen above.
Leaving the WITHUNWRAP
```
{
  "schema": {
    "type": "struct",
    "fields": [{
      "type": "string",
      "optional": true,
      "field": "event_data"
    }],
    "optional": false,
    "name": "blog.pack_events"
  },
  "payload": {
    "event_data": "{\"foo\":\"bar\"}"
  }
}
```
If we leave WITHUNWRAP off when using the StringConverter (more on that later), we would get the following :
Struct:{event_data={“foo”:“bar”}}
We will need to use the combination of WITHUNWRAP
StringConverter
Configuring the connector: Tuning Parameters
We will explore these in another post. But for now let’s start looking for data in our table with a starting date/time of today. We will also poll every second.
```
{
  "name": "packs",
  "config": {
    "tasks.max": "1",
    …
    "connect.cassandra.initial.offset": "2018–01–22 00:00:00.0000000Z",
    "connect.cassandra.import.poll.interval": 1000
  }
}
```
Setting up the infrastructure
We will be using the following products:
- Apache Cassandra 3.11.1
- Apache Kafka and Kafka Connect 1.0
- Lenses.io
Installing Cassandra
Installation instructions for Apache Cassandra can be found on the web
(link).
Once installed and started the cluster can be verified using the following command:
nodetool -h [IP] status
This will generate a response like the following:
```
Datacenter: dc1
===============
Status=Up/Down
|/ State=Normal/Leaving/Joining/Moving
-- Address   Load        Tokens    Owns (effective) HostID   Rack
UN 10.x.x.x  96.13GiB      64      39.6%            [UUID]    r6
UN 10.x.x.x  148.98GiB     64      33.6%            [UUID]    r5
UN 10.x.x.x  88.08GiB      64      36.4%            [UUID]    r5
UN 10.x.x.x  97.96GiB      64      30.4%            [UUID]    r6
UN 10.x.x.x  146.89GiB     64      33.2%            [UUID]    r7
UN 10.x.x.x  205.24GiB     64      36.8%            [UUID]    r7
```
Installing Kafka and Kafka Connect
Kafka Connect is shipped and installed as part of Apache Kafka. Instructions for these are also available on the web
(link).
- Download the tar file (link).
- Install the tar file.
```
tar -xzf kafka_2.11–1.0.0.tgz
cd kafka_2.11–1.0.0
```
Starting Kafka
This post will not attempt to explain the architecture behind a Kafka cluster. However, a typical installation will
have several Kafka brokers and Apache Zookeeper.
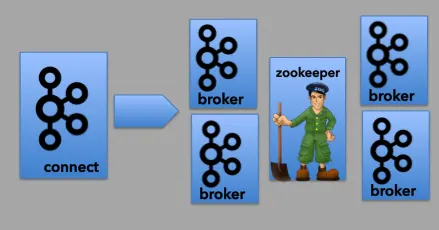
To run Kafka, first start Zookeeper, then start the Kafka brokers. The following commands assume a local installation with only one node:
bin/zookeeper-server-start.sh config/zookeeper.properties
and
bin/kafka-server-start.sh config/server.properties
Once we have Kafka installed and running, we need to create four topics. One is used by our application to publish
our pack JSON. The other three are required by Kafka Connect. We will continue to assume that most are running this
initially on a laptop so we will set the replication factor to 1.
```
bin/kafka-topics.sh — create — topic test_topic -zookeeper localhost:2181 — replication-factor 1 — partitions 3
```
and
```
bin/kafka-topics.sh — create — zookeeper localhost:2181 — topic connect-configs — replication-factor 1 — partitions 1 — config cleanup.policy=compact
bin/kafka-topics.sh — create — zookeeper localhost:2181 — topic connect-offsets — replication-factor 1 — partitions 50 — config cleanup.policy=compact
bin/kafka-topics.sh — create — zookeeper localhost:2181 — topic connect-status — replication-factor 1 — partitions 10 — config cleanup.policy=compact
```
In order to verify that the four topics have been created, run the following command:
bin/kafka-topics.sh — list — zookeeper localhost:2181
Installing the Cassandra Source connector
Lenses.io offers numerous connectors for Kafka Connect. These are all available as open source. The first thing we need to do is download the Cassandra Source connector jar file
(link).
- kafka-connect-cassandra-1.0.0–1.0.0-all.tar.gz
Unzip the tar file and copy the jar file to the libs
Configuring Kafka Connect
We need to tell Kafka Connect where the Kafka cluster is. In the config folder where Kafka was installed we will find the file: connect-distributed.properties
bootstrap.servers
bootstrap.servers=localhost:9092
Starting Kafka Connect
We can now start up our distributed Kafka Connect service. For more information on stand-alone vs distributed mode, see
the documentation.
bin/connect-distributed.sh config/connect-distributed.properties
If all has gone well, you should see the following on your console:
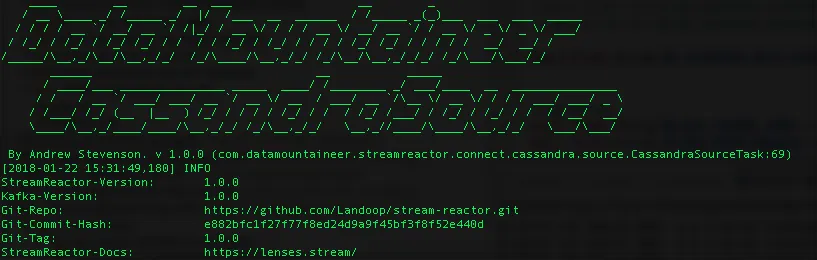
In case you are wondering, “Data Mountaineer” is a company from Netherlands that merged with Lenses.io (link).
Adding the Cassandra Source connector
Kafka Connect has a REST API to interact with connectors. We need to add the Cassandra Source connector to the Kafka Connect. This is done by sending
the property file (connect-cassandra-source.json
```
curl -X POST -H “Content-Type: application/json” -d @connect-cassandra-
source.json localhost:8083/connectors
```
Once we have successfully loaded the connector, we can check to see the installed connectors using this API:
curl localhost:8083/connectors
That should return a list of the connectors by their configured names:
[“packs”]
Testing the Cassandra Source connector
In order to test everything out, we will need to insert some data into our table.
```
INSERT INTO pack_events (event_id, event_ts, event_data)
VALUES (‘500’, ‘2018–01–22T20:28:50.869Z’, ‘{“foo”:“bar”}’);
```
We can check what is being written to the Kafka topic by running the following command:
bin/kafka-console-consumer.sh — bootstrap-server localhost:9092 — topic test_topic
At this point, we might be surprised to see something like this:
```
{
  "schema":{
    "type":"string",
    "optional":false
  },
  "payload":"{\"foo\":\"bar\"}"
}
```
That is better than what we were getting without WITHUNWRAP but isn’t exactly what we were hoping for. To get the
JSON value that was written to the table column we need to update the connect-distributed.properties
Open this up and look for JsonConverter. Replace those lines with the following:
Restart Kafka Connect.
Insert another row into the table.
Now we should get what we want.
{ “foo”:“bar” }
Happy coding!
Read the second part of this article here - Tuning the Kafka Connect Cassandra Source (part 2)
References
- Stream-Reactor GitHub project
- Kafka Connector documentation for Cassandra Source
- Kafka Connector documentation for Cassandra Sink
- This originally appeared on TheAgileJedi blog here